DIY QR Decoder in Python using basic computer vision (openCV)
UPDATE. New version, implementing error correction can be found HERE
Walkthrough to code a Python script that can read QR code, and decode it.
OpenCV actually has some built-in function to directly decode QR code (cf QRCodeDetector), that would be way more reliable than this implementation.
However, the goal here is to do a simple and crude implementation by ourself to show how it can be done with simple computer vision methods. This implementation is far from beeing bullet-proof.
Limitations:
- Computer vision: Do not check nor correct the image orientation.
- Check HERE how it can be done
- Decoding: The only implementation is QR Version 1 (21x21), byte-encoded
- Not dealing with error correction features
Part 1 - Image processing
The first part is dedicated at reading the QR code from an image. The goal is to end up with a binary matrix that is the representation of the QR code image
Load QR code
Load your QR code image, and import the required python modules.
import cv2
import numpy as np
from matplotlib import pyplot as plt
plt.rcParams["figure.figsize"] = (10,10)
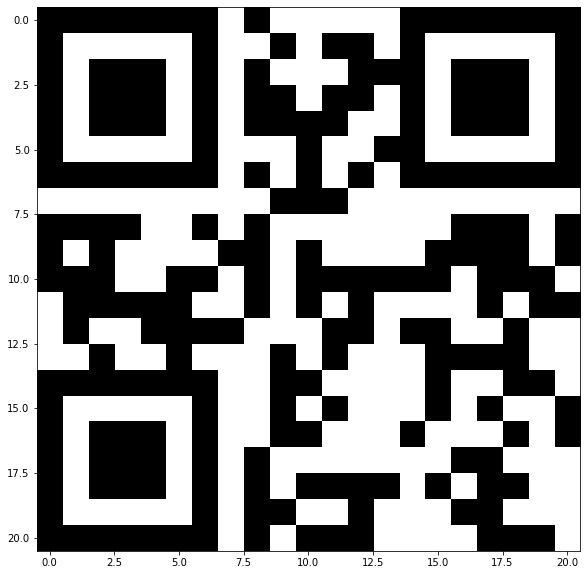
# open your QR image
img = cv2.imread("samples/QR.png", cv2.IMREAD_COLOR) # open in grayscale
gray = cv2.cvtColor(img, cv2.COLOR_BGR2GRAY) #convert to gray
plt.imshow(img)
<matplotlib.image.AxesImage at 0x12137679af0>

Preprocessing - Prepare the image
As a pre-processing step, we only apply a threshold on the image so that we only deal with binary pixels, either fully white, or black.
In a real world use case, where the picture might comes from a smartphone camera, we would have to perform other and more complicated preprocessing of the image. Especially to deal with scale and orientation. SIFT could be the way to deal with that. We don’t want to add this complexity here.
# thresholding, all pixel > 120 will be set to 255, the other to 0
_, gray = cv2.threshold(gray, 120, 255, cv2.THRESH_BINARY)
#plt.imshow(gray, cmap='gray')
Processing - Extract the bits
Multiple steps are needed here to achieve this goal.
3 corners
Find the QR code features (ie the 3 corners)
# find all countour
cnts, hierarchies = cv2.findContours(gray, cv2.RETR_TREE, cv2.CHAIN_APPROX_SIMPLE)

# find the 3 corners
# corners are countour with at least 2 child
idx_of_interest = []
for i in range(len(cnts)):
        cnt = cnts[i]
        hierarchy = hierarchies[0][i]

        child_nb = 0
        while(hierarchy[2] != -1): # [Next, Previous, First_Child, Parent]
                hierarchy = hierarchies[0][hierarchy[2]]
                child_nb += 1

        if(child_nb == 2):
                idx_of_interest.append(i)

corners = np.empty((0, 4))
for i in idx_of_interest:
        cnt = cnts[i]
        x,y,w,h = cv2.boundingRect(cnt)
        x,y,w,h = x,y,w-1,h-1
        # corners should have the same width & height
        if(np.abs(w-h)<3):
                corners = np.append(corners, np.array([[x,y,w,h]]), axis=0)

# draw the overall region of interest = QR code area

x_min = np.min(corners, axis=0)[0]
y_min = np.min(corners, axis=0)[1]
x_max = np.max(corners, axis=0)[0] + corners[np.argmax(corners, axis=0)[0]][2] # x + w
y_max = np.max(corners, axis=0)[1] + corners[np.argmax(corners, axis=0)[1]][3] # y + h

ROI = [int(x_min), int(y_min), int(x_max), int(y_max)]
cv2.rectangle(img, (ROI[0], ROI[1]), (ROI[2], ROI[3]), (0,0,255), 1)

# draw the corner on the original img
for corner in corners:
        x,y,w,h = round(corner[0]), round(corner[1]), round(corner[2]), round(corner[3])
        cv2.rectangle(img, (x, y), (x + w, y + h), (255,0,0), 1)

plt.imshow(img[ROI[1]:ROI[3], ROI[0]:ROI[2]])
<matplotlib.image.AxesImage at 0x12135e562b0>

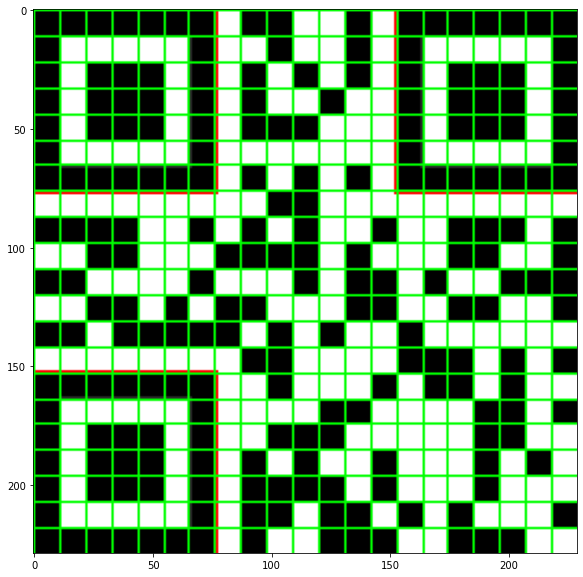
Build the grid
From the 3 corners, we can estimate the cell (=bit) size, and construct the grid for reading the individual bits
# each corner should be a 7x7 cell size
# knowing that, we can estimate the cell size
cell_size = (np.mean(corners, axis=0)[2]-1) / 7
nb_cell_x = round((ROI[2] - ROI[0]) / cell_size)
nb_cell_y = round((ROI[3] - ROI[1]) / cell_size)
assert nb_cell_x == nb_cell_y
std_size = [21, 25, 29, 33, 37, 41, 45, 49, 53, 57, 61, 65, 69, 73, 77, 81, 85, 89, 93, 97, 101, 105]
# find closest standard cell number
nb_cell_x = min(std_size, key=lambda x:abs(x-nb_cell_x))
nb_cell = nb_cell_x
# affine cell_size
cell_size = (ROI[2] - ROI[0]) / nb_cell_x

print("Cell size: {} px, nb cell: {}x{}".format(cell_size, nb_cell, nb_cell))

#draw grid
for i in range(nb_cell + 1):
    x = round(ROI[0] + i*cell_size)
    y = round(ROI[1] + i*cell_size)
    cv2.line(img, (x, ROI[1]), (x, ROI[3]), (0, 255, 0), 1) # vertical
    cv2.line(img, (ROI[0], y), (ROI[2], y), (0, 255, 0), 1) # horizontal

plt.imshow(img[ROI[1]:ROI[3], ROI[0]:ROI[2]])
Cell size: 10.904761904761905 px, nb cell: 21x21


<matplotlib.image.AxesImage at 0x12138e4bc70>
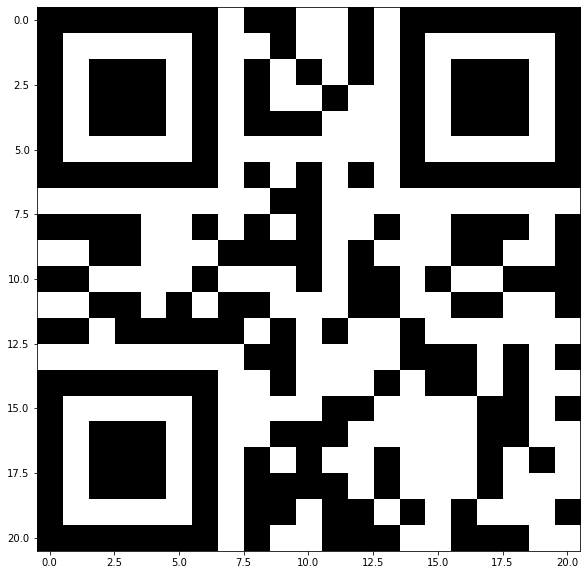
Extract the bits
Now that we have the grid, we can simply use it the extract the bit value, black or white (1 or 0). To read the bit value, we average the pixels within the cell and apply a threshold. To be more reliable, we use a gaussian kernel to average the cell pixels, so that the middle pixel has more weight than the ones on the side. This helps if the grid is not precise.
# extract bit value, from gray img
raw_bit_matrix = np.zeros((nb_cell, nb_cell), int)
for i in range(nb_cell):
    for j in range(nb_cell): #X
        # compute avg pixel value in the cell
        x1, x2 = round(ROI[0] + i*cell_size), round(ROI[0] + (i+1)*cell_size)
        y1, y2 = round(ROI[1] + j*cell_size), round(ROI[1] + (j+1)*cell_size)
        # compute the average pixel val, with a Gaussian filter to give more weight to middle pixels
        pixel_avg = np.mean(cv2.GaussianBlur(gray[y1:y2, x1:x2],(5,5),0))
        #pixel_avg = np.mean(gray[y1:y2, x1:x2])
        bit_val = 1 if pixel_avg < 140 else 0
        raw_bit_matrix[j,i] = bit_val

print(raw_bit_matrix)
plt.imshow(1-raw_bit_matrix, cmap='gray') # 1-matrix to invert the color
[[1 1 1 1 1 1 1 0 1 1 0 0 1 0 1 1 1 1 1 1 1]
 [1 0 0 0 0 0 1 0 0 1 0 0 1 0 1 0 0 0 0 0 1]
 [1 0 1 1 1 0 1 0 1 0 1 0 1 0 1 0 1 1 1 0 1]
 [1 0 1 1 1 0 1 0 1 0 0 1 0 0 1 0 1 1 1 0 1]
 [1 0 1 1 1 0 1 0 1 1 1 0 0 0 1 0 1 1 1 0 1]
 [1 0 0 0 0 0 1 0 0 0 0 0 0 0 1 0 0 0 0 0 1]
 [1 1 1 1 1 1 1 0 1 0 1 0 1 0 1 1 1 1 1 1 1]
 [0 0 0 0 0 0 0 0 0 1 1 0 0 0 0 0 0 0 0 0 0]
 [1 1 1 1 0 0 1 0 1 0 1 0 0 1 0 0 1 1 1 0 1]
 [0 0 1 1 0 0 0 1 1 1 1 0 1 0 0 0 1 1 0 0 1]
 [1 1 0 0 0 0 1 0 0 0 1 0 1 1 0 1 0 0 1 1 1]
 [0 0 1 1 0 1 0 1 1 0 0 0 1 1 0 0 1 1 0 0 1]
 [1 1 0 1 1 1 1 1 0 1 0 1 0 0 1 0 0 0 0 0 0]
 [0 0 0 0 0 0 0 0 1 1 0 0 0 0 1 1 1 0 1 0 1]
 [1 1 1 1 1 1 1 0 0 1 0 0 0 1 0 1 1 0 1 0 0]
 [1 0 0 0 0 0 1 0 0 0 0 1 1 0 0 0 0 1 1 0 1]
 [1 0 1 1 1 0 1 0 0 1 1 1 0 0 0 0 0 1 1 0 0]
 [1 0 1 1 1 0 1 0 1 0 1 0 0 1 0 0 0 1 0 1 0]
 [1 0 1 1 1 0 1 0 1 1 1 1 0 1 0 0 0 1 0 0 0]
 [1 0 0 0 0 0 1 0 1 1 0 1 1 0 1 0 1 0 0 0 1]
 [1 1 1 1 1 1 1 0 1 0 0 1 1 1 0 0 1 1 1 0 0]]


<matplotlib.image.AxesImage at 0x121398e6160>
Part 2 - Decoding
Limitation: Only decode Version 1 (21x21), byte-encoded QR code. Bigger QR code, and not byte-encoded are not implemented. Error correction is not implemented either.
Encoding and Masking
The first thing to do is to read the QR format information, especially the mask number applied:
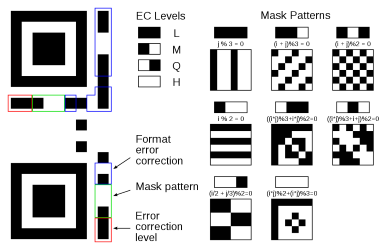
(Source: Wikipedia)
Once the mask is known, we need to apply the mask on the grid and invert the masked cell. We also check the encoding, by reading the 2x2 bottom right corner. This implementation is decoding only the byte encoding.
assert nb_cell == 21 # only implementation

# Error correction level
ec_level_hor = raw_bit_matrix[8, 0:2]
ec_level_ver = raw_bit_matrix[nb_cell-2:nb_cell, 8]
assert ec_level_hor[0] == ec_level_ver[1] and ec_level_hor[1] == ec_level_ver[0]
print("Error corr pattern: {}".format(ec_level_hor))

# mask pattern
def generate_mask(mask_pattern, nb_cell):
    def generate_fixed_mask(nb_cell):
        """ The mask is only applied to the data, not the fixed pattern """
        mask = np.ones((nb_cell, nb_cell), int)
        mask[0:9, 0:9] = 0
        mask[nb_cell-7:nb_cell, 0:9] = 0
        mask[0:9, nb_cell-7:nb_cell] = 0
        mask[6, :] = 0
        mask[:, 6] = 0
        return mask

    if(np.array_equal(mask_pattern, np.array([0, 0, 0]))):
        def mask_gen(i, j):
            bit = 1 if((i+j)%2 == 0) else 0
            return bit

    elif(np.array_equal(mask_pattern, np.array([0, 0, 1]))):
        def mask_gen(i, j):
            bit = 1 if(i%2 == 0) else 0
            return bit

    elif(np.array_equal(mask_pattern, np.array([0, 1, 0]))):
        def mask_gen(i, j):
            bit = 1 if(j%3 == 0) else 0
            return bit

    elif(np.array_equal(mask_pattern, np.array([0, 1, 1]))):
        def mask_gen(i, j):
            bit = 1 if((i+j)%3 == 0) else 0
            return bit

    elif(np.array_equal(mask_pattern, np.array([1, 0, 0]))):
        def mask_gen(i, j):
            bit = 1 if((i/2+j/3)%2 == 0) else 0
            return bit

    elif(np.array_equal(mask_pattern, np.array([1, 0, 1]))):
        def mask_gen(i, j):
            bit = 1 if( (i*j)%2 + (i*j)%3 == 0) else 0
            return bit

    elif(np.array_equal(mask_pattern, np.array([1, 1, 0]))):
        def mask_gen(i, j):
            bit = 1 if( ((i*j)%3 + (i*j))%2 == 0) else 0
            return bit

    elif(np.array_equal(mask_pattern, np.array([1, 1, 1]))):
        def mask_gen(i, j):
            bit = 1 if( ((i*j)%3 + i + j)%2 == 0) else 0
            return bit

    mask = np.zeros((nb_cell, nb_cell), int)
    for i in range(nb_cell):
        for j in range(nb_cell):
            mask[i, j] = mask_gen(i,j)

    fixed_mask = generate_fixed_mask(nb_cell)

    return np.multiply(mask, fixed_mask)

# find the correct mask and generate it
mask_pat_hor = np.flip(raw_bit_matrix[8, 2:5])
mask_pat_ver = np.flip(raw_bit_matrix[nb_cell-5:nb_cell-2, 8])
assert mask_pat_hor[0] == mask_pat_ver[2] and mask_pat_hor[2] == mask_pat_ver[0] and mask_pat_hor[1] == mask_pat_ver[1]
print("Mask pattern: {}".format(mask_pat_hor))
mask = generate_mask(mask_pat_hor, nb_cell)
#plt.imshow(1-mask, cmap='gray') # 1-matrix to invert the color

# apply mask on matrix
unmasked_matrix = np.bitwise_xor(raw_bit_matrix, mask)
plt.imshow(1-unmasked_matrix, cmap='gray') # 1-matrix to invert the color

# encoding, make sure it is byte-encoded (only implementation)
enc = unmasked_matrix[nb_cell-2:nb_cell, nb_cell-2:nb_cell]
print("Encoding pattern: \n{}".format(enc))
assert np.array_equal(enc, np.array([[0, 0], [1, 0]]))
Error corr pattern: [1 1]
Mask pattern: [0 1 1]
Encoding pattern:
[[0 0]
 [1 0]]
Read the data
Finally, we can read the data, block by block, following this format:

(Source: Wikipedia)
def binlist_to_int(l):
    res = 0
    for digits in l:
        res = (res << 1) | digits
    return res

def read_block_down_up(bloc):
    l = [bloc[3, 1], bloc[3, 0], bloc[2, 1], bloc[2, 0], bloc[1, 1], bloc[1, 0], bloc[0, 1], bloc[0, 0]]
    return binlist_to_int(l)

def read_block_up_down(bloc):
    l = [bloc[0, 1], bloc[0, 0], bloc[1, 1], bloc[1, 0], bloc[2, 1], bloc[2, 0], bloc[3, 1], bloc[3, 0]]
    return binlist_to_int(l)

def read_right_left_down(bloc):
    l = [bloc[1, 3], bloc[1, 2], bloc[0, 3], bloc[0, 2], bloc[0, 1], bloc[0, 0], bloc[1, 1], bloc[1, 0]]
    return binlist_to_int(l)

def read_right_left_up(bloc):
    l = [bloc[0, 3], bloc[0, 2], bloc[1, 3], bloc[1, 2], bloc[1, 1], bloc[1, 0], bloc[0, 1], bloc[0, 0]]
    return binlist_to_int(l)

# msg length
length_bloc = unmasked_matrix[nb_cell-6:nb_cell-2, nb_cell-2:]
length = read_block_down_up(length_bloc)
print("msg length: {}".format(length))

# data block
d1_bloc = unmasked_matrix[nb_cell-10:nb_cell-6, nb_cell-2:]
d2_bloc = unmasked_matrix[nb_cell-12:nb_cell-10, nb_cell-4:]
d3_bloc = unmasked_matrix[nb_cell-10:nb_cell-6, nb_cell-4:nb_cell-2]
d4_bloc = unmasked_matrix[nb_cell-6:nb_cell-2, nb_cell-4:nb_cell-2]
d5_bloc = unmasked_matrix[nb_cell-2:, nb_cell-6:nb_cell-2]
d6_bloc = unmasked_matrix[nb_cell-6:nb_cell-2, nb_cell-6:nb_cell-2]
d7_bloc = unmasked_matrix[nb_cell-10:nb_cell-6, nb_cell-6:nb_cell-2]
d8_bloc = unmasked_matrix[nb_cell-12:nb_cell-10, nb_cell-8:nb_cell-4]
d9_bloc = unmasked_matrix[nb_cell-10:nb_cell-6, nb_cell-8:nb_cell-4]
d10_bloc = unmasked_matrix[nb_cell-6:nb_cell-2, nb_cell-8:nb_cell-4]
# todo add next bloc

data = [
    chr(read_block_down_up(d1_bloc)), chr(read_right_left_down(d2_bloc)), chr(read_block_up_down(d3_bloc)),
    chr(read_block_up_down(d4_bloc)), chr(read_right_left_up(d5_bloc)), chr(read_block_down_up(d6_bloc)),
    chr(read_block_down_up(d7_bloc)), chr(read_right_left_down(d8_bloc)), chr(read_block_up_down(d9_bloc)),
    chr(read_block_up_down(d10_bloc))]
msg = ''
for c in data:
    msg += c
print("QR Decoded Message: {}".format(msg))
msg length: 10
QR Decoded Message: Congrats !
That’s it ! We manage to decod “manually” this QR code. As said before, this code is just a demonstration on how it can be done with simple steps using python. It is not reliable and the implementation is not complete.
Interesting things to try:
- Pre-processing: deal with distorded images, align features
- Decoding: Add more blocks, while taking into account the error level
- Decoding: Include error detection and correction
- Decoding: Deal with more encoding